TOC
Custom Fonts and Icons in Xamarin.Forms
Custom Fonts and using Icons in your project sounds like a lot of work and importing projects like FFImageLoading or Iconize both amazing packages but for this a bit of overkill (if you can get the icons as a font pack!).
So the first job is to get the custom font pack from the design team or the web and we want this in a .ttf format, if you want Icons then I recommend using the Icon font pack from Material Design Icons you can download the whole Icon pack as a Zip using the big download button top right and inside this zip you will find the .ttf file. Of course there are others but this pack has over 2800 icons and an active community adding more all the time.
Adding the .ttf Font file to your Project.
To use the Font file you first need to add it to each OS project, this is the same process for a Custom Font file or the Icon Font file we are using here…
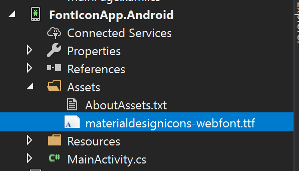
Android
Place the file inside the Assets folder (Not the Resources folder!) and be sure to set it’s Build type to AndroidAsset, you can do this by right clicking on the file and selecting properties.
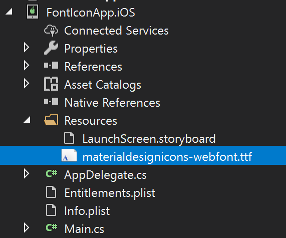
IOS
Place the file inside the Resources folder and be sure to set it’s Build type to BundleResource.
Also on IOS (It’s never easy with Apple!) you have to include the files in the info.plist as well so that they can be found and used. Obviously if you have more than one font pack you are importing then just add more references inside the array.
<key>UIAppFonts</key>
<array>
    <string>materialdesignicons-webfont.ttf</string>
</array>
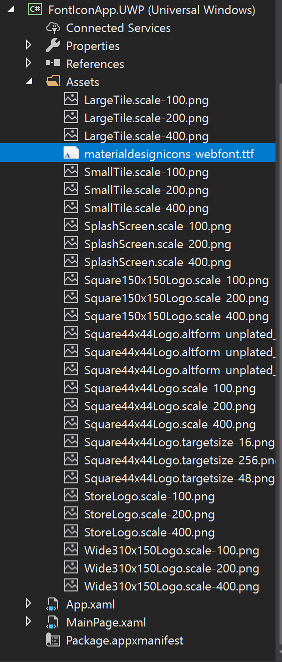
UWP
Place the file inside the Assets folder and be sure to set it’s Build type to Content.
Add the Font Pack to the Shared Project
Now that each of the OS projects have the file in their respective Assets folders we need to set-up and use the font pack where we need it in the Shared Project. The best way I have found to do this is to add the new Font pack as a Resource to the shared Resource Dictionary, so add it to either your App.Xaml or the Page.Xaml you want the font/icon used on. You will notice that I have set the Key (3rd line down) to ‘IconFont’ this is your name for the Font pack and can be set to what ever naming convention you choose but you will match it up later.
<ResourceDictionary>
    <OnPlatform x:TypeArguments="x:String"
                x:Key="IconFont">
        <On Platform="Andriod"
            Value="materialdesignicons-webfont.ttf#Material Design Icons" />
        <On Platform="iOS"
            Value="materialdesignicons-webfont" />
        <On Platform="UWP"
            Value="/Assets/materialdesignicons-webfont.ttf#Material Design Icons" />
    </OnPlatform>
</ResourceDictionary>
As you can see we need to add an entry for each OS as they each have different values. For IOS you leave the file extention off, but for Android and UWP it needs the .ttf extension and they also have:
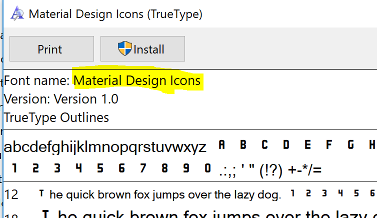
Material Design Icons
This is the actual name of the Font inside the .ttf file, the easy way to find this out is to open the .ttf file in file explorer and it will be displayed at the top. It is best to check this as you can see for the Material Design Icon pack I am using here the File name and Font name are different.
Finally Using the Fonts
So now we are set-up and in a position to add the text and icons to our Buttons and Labels and this is the easy bit, as you just need to set the FontFamily with the Static Resource name you gave in your Resource Dictionary above so for me here it’s ‘IconFont’
<Button Text=""
TextColor="Green"
BackgroundColor="Transparent"
FontFamily="{StaticResource IconFont}"
FontSize="Medium" />
As you can see, you can set the rest of the Text formatting as normal Color, Size etc. These will also work from CSS if you are using that new and very cool ability within XamarinForms, if your not now is your chance to go look at the docs XamarinForms with CSS
But what about Icons
Well if you look at the Text I have set for the button above you will see it looks like I just slapped the keyboard… but no that string has meaning…

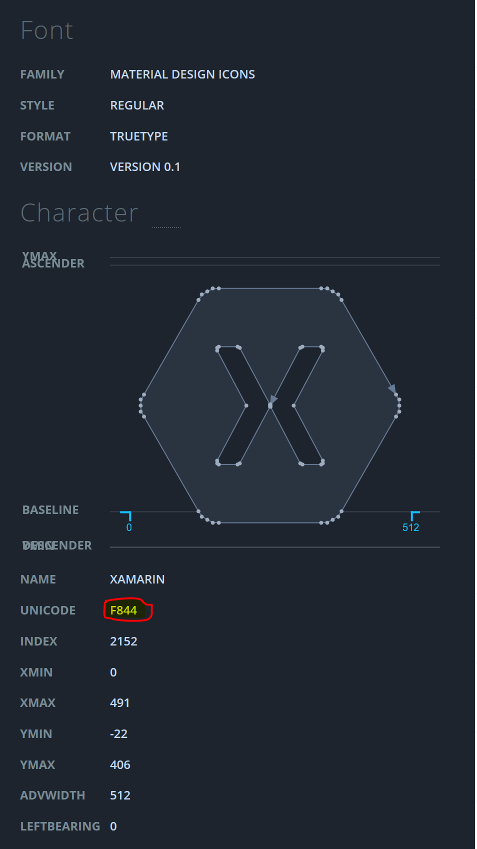
The ‘&#x’ and trailing ‘;’ are standard and ensure that the Font Pack gives back an Icon and not text like ABC123. The part in the middle that starts with ‘f’ is the icon Unicode within the font pack so in this case
f844
This just so happens to be the Xamarin Logo (yes Material Design Icon pack is that big.)
The awesome part is that as it’s just plain text so if your feeling adventurous make this a Binding to your ViewModel and change the Icon’s on the fly.
If you find looking around on the Material Design Icons website difficult as a search will show the icon and it’s name rather than the ID then I found this web tool CharacterMap that you can load the .ttf file into and it shows the icon and all of it’s details including the important ‘f’ Unicode
CSS @Font-Face
I now use CSS in all my Xamarin Projects and love that something I used in the web world has come over as it’s much cleaner and easier than adding massive ResourceDictionary’s to my projects. However the CSS on the Xamarin side isn’t fully compliant yet (It’s being worked on!) so if you are thinking about using @Font-Face in your CSS this isn’t currently supported.
Conclusion
So as you can see adding a custom font to your project or even an Icon set is very easy, however if you just want one Icon that maybe has been designed in house you have the option of either going back to FFImageLoading or Iconize or of course if you wish to share your new awesome icon then why not submit it to the Material Design Icons project so we can all use it.
I hope this helps and any errors please let me know in the comments below, happy coding…