TOC
Getting Started
In this series of posts we have been explaining how to get started with .NET MAUI and deep dive into the sections that make up a MAUI App while we create a simple demo App.
In our previous post MAUI Deep Dive Part 2 we covered adding Shell Navigation stack to our demo app and creating a simple CollectionView with data pulled from the Web.
However if this is all new I suggest you have a read of Parts 1 & 2 for more info and then come back here to continue the Deep Dive.
As MAUI is still in preview and since the last post in line with the monthly release cadence of the MAUI previews we have moved from Preview 12 to Preview 14 (March 2022) so if you have downloaded older than 14 I suggest you update to the latest Visual Studio 22 preview release to get the new bits, it’s the Preview of VS22 you update to get the latest MAUI bits in case your wondering. The team are still aiming for a May 22 GA widely rumoured to be at BUILD so I am expecting the next release to be either the last preview or RC1.
This blog was ready a week ago but there was going to be so many changes between Previews 13 and 14 that it was best to wait to see what would affect us on this journey rather than the blog being outdated as soon as it was published…
Adding Styling
Looking at the App as we left it in Part 2 the styling isn’t going to win any design competitions and to be honest before we start I am no designer so our changes are just going to show the process rather than make it a great APP design, you can have that task as homework. 😜
A quick reminder of what it looked like before:
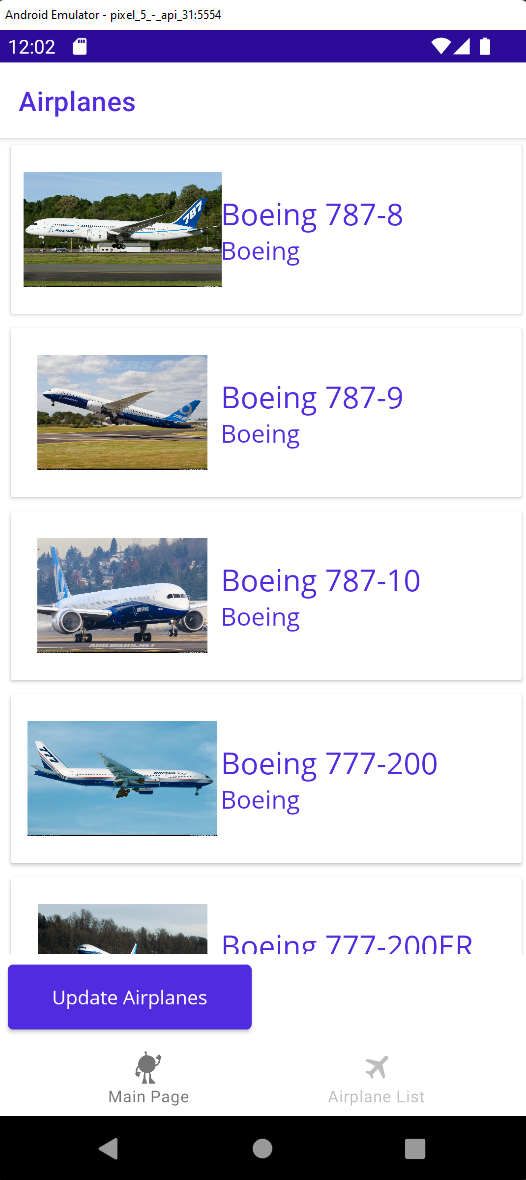
So how do we add styling to our app so that we can start to improve the design, well like most things with software there are multiple ways to tackle this problem but lets start with the layout of the page. You will notice that the images are the same height but different width so we need to fix that, the Update button at the bottom of the page is to the left and we want that centred, well these are fixed in the page XAML.
<CollectionView
    Grid.ColumnSpan="2"
    ItemsSource="{Binding Airplanes}"
    SelectionMode="Single">
    <CollectionView.ItemTemplate>
        <DataTemplate>
            <Grid Padding="5,5">
                <Frame
                    Padding="10"
                    HeightRequest="100"
                    Style="{StaticResource CardView}">
                    <Grid
                        Padding="0"
                        ColumnDefinitions="125,*"
                        RowDefinitions="*"
                        VerticalOptions="FillAndExpand">
                        <Image
                            Grid.Column="0"
                            Margin="0,20,0,0"
                            Aspect="AspectFill"
                            HorizontalOptions="Center"
                            MaximumWidthRequest="100"
                            Source="{Binding Image}"
                            VerticalOptions="Center" />
                        <StackLayout
                            Grid.Column="1"
                            VerticalOptions="Center">
                            <Label
                                FontAttributes="Bold"
                                FontFamily="Nunito"
                                FontSize="Large"
                                Text="{Binding Name}"
                                TextColor="DarkBlue" />
                            <StackLayout Orientation="Horizontal">
                                <Label
                                    FontFamily="Nunito"
                                    FontSize="Small"
                                    Text="Built By:  "
                                    TextColor="Black"
                                    VerticalTextAlignment="Center" />
                                <Label
                                    FontFamily="Nunito"
                                    FontSize="Medium"
                                    Text="{Binding Manufacturer}"
                                    TextColor="DarkBlue" />
                            </StackLayout>
                            <StackLayout Orientation="Horizontal">
                                <Label
                                    FontFamily="Nunito"
                                    FontSize="Small"
                                    Text="Max Passenger:  "
                                    TextColor="Black"
                                    VerticalTextAlignment="Center" />
                                <Label
                                    FontFamily="Nunito"
                                    FontSize="Medium"
                                    Text="{Binding MaxPassengers}"
                                    TextColor="DarkBlue" />
                            </StackLayout>
                        </StackLayout>
                    </Grid>
                </Frame>
            </Grid>
        </DataTemplate>
    </CollectionView.ItemTemplate>
</CollectionView>
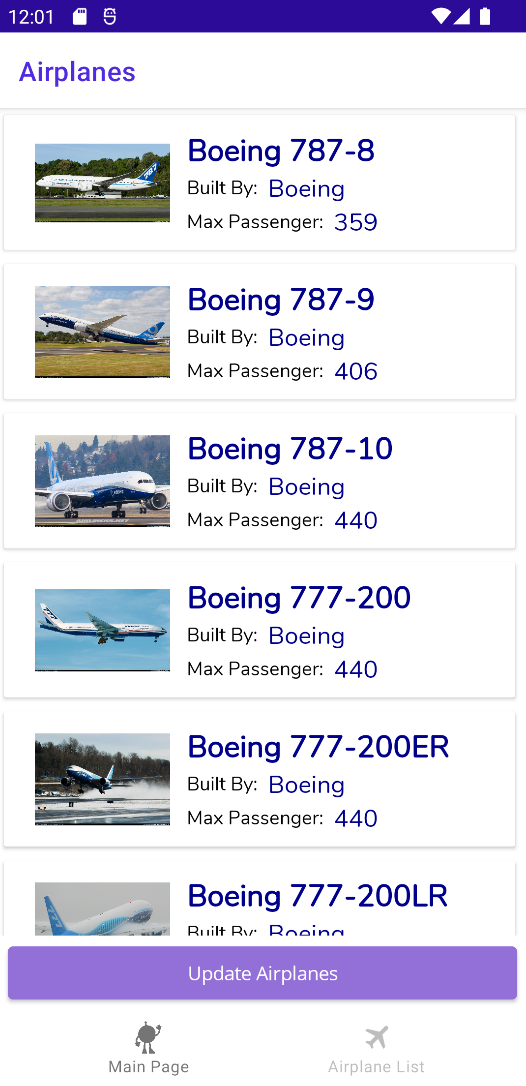
As you can see with a few changes to the XAML it look a lot neater but if you look at the XAML you will see we are hard coding the Colours, Fonts etc all things that if we were a Web Dev would live in our CSS that we get from our designer. This means if we want to change the colour of all the Labels from Dark Blue to say a nice Fuchsia it would be an exercise of Find and Replace.
The way around this is using a Resource Dictionary this means we have one central place to make changes so open the App.xaml page and you will find there is already some styling present from the MAUI Template we are using but lets add some more.
<Style
    x:Key="AircraftImage"
    TargetType="Image">
    <Setter Property="Margin" Value="0,20,0,0" />
    <Setter Property="Aspect" Value="AspectFill" />
    <Setter Property="HorizontalOptions" Value="Center" />
    <Setter Property="VerticalOptions" Value="Center" />
    <Setter Property="MaximumWidthRequest" Value="100" />
</Style>

<Style
    x:Key="TitleLabel"
    TargetType="Label">
    <Setter Property="TextColor" Value="{DynamicResource LabelBlue}" />
    <Setter Property="FontFamily" Value="Nunito" />
    <Setter Property="FontAttributes" Value="Bold" />
    <Setter Property="FontSize" Value="Large" />
</Style>

<Style
    x:Key="DataLabel"
    TargetType="Label">
    <Setter Property="TextColor" Value="{DynamicResource LabelBlue}" />
    <Setter Property="FontFamily" Value="Nunito" />
    <Setter Property="FontSize" Value="Medium" />
    <Setter Property="VerticalTextAlignment" Value="Center" />
</Style>

<Style
    x:Key="UpdateButton"
    TargetType="Button">
    <Setter Property="TextColor" Value="{DynamicResource SecondaryColor}" />
    <Setter Property="FontFamily" Value="OpenSansRegular" />
    <Setter Property="BackgroundColor" Value="{DynamicResource PrimaryColor}" />
    <Setter Property="Padding" Value="14,10" />
    <Setter Property="Margin" Value="8" />
    <Setter Property="Grid.ColumnSpan" Value="2" />
</Style>
As you can see here we add a Style to the ResourceDictionary (So between the ResourceDictionary tags) and when adding we give it a x:Key which is the name of the Style and also a TargetType like Button/Label etc this we fill with the styles we wish to add and Visual Studio will even aid you with intellisense so that if you set the TargetType as Button the Property field will only show you the properties that apply to a button which is very cool.
Once we add these and go back to the page XAML we can remove all the fixed styles we added before and replace it with one Style giving the StaticResource name, and as you can see in this image as we are setting the style on a button we will only see the styles that apply to a TargetType of Button again IntelliSense is helping us not make mistakes.

After setting the Style on an element if we want to adjust it for that one button/label etc we can set a property in the XAML and it will override the style pulled in from the ResourceDictionary. So say we want this one button to be Green but the Button style has it as Blue we can change the BackgroundColor in XAML and it will just affect the colour only and on that button only so giving a lot of control.
This is very handy if you want to adjust something based on code as you can Bind the color to a property in your ViewModel so that the button turns green say when the form is complete.
What About Large Projects.
I know what your thinking probably the same as me when I started with Xamarin and the same goes for MAUI if the project is large this App.xaml page is going to be huge with all the styles. Well that can be resolved by having multiple Resource Dictionaries or even have one set at a page level by setting at the top of the XAML page the the ResourceDictionary that page uses you can read more about this in the MAUI Docs Here.
CSS?
The other question I am asked a lot is around using CSS files that are provided by Design teams or copied over from the company Website, this is possible and I have used this in a Xamarin.Forms project for exactly this reason. Just be aware that obviously this isn’t the web so all the fancy web things you can do with CSS like Bootstrap etc are not going to work but the CSS in Xamarin/MAUI works the same way so background-color: lightgray; works it’s just you have to be a bit more specific when using your CSS Selectors. All of this is beyond the scope of this blog and sadly at the time of writing the MAUI docs are not written for this yet but I believe there is very little if any change from the way it was achieved in Xamarin.Forms so you can use those docs which can be found here
Navigating to a Sub Page.
Apps that have CollectionViews like our the users expect to be able to tap the item in the list to see more details about that item and to achieve this we need to add navigation to the page. The good news is that we have ShellNavigation in our App which is now the default template as of Preview 14 as the team thought it was so important so no need to add Shell like we did in the first blog post in this series.
Lets add a Command to take us to a new page so that we can show the rest of the details from our dataset.
This time as we want to use an Async method on the Navigation stack we will add an AsyncCommand which we can use from the MVVMHelpers library that Visual Studio will pull in for us, we then set the AsyncCommand type to <Airplane> as this is what will be passed from the View we will cover that in a moment.
public IAsyncCommand<Airplane> SelectAirplaneCommand { get; set; }

public AirplanesListViewModel()
{
    // Set the Page Title...
    Title = "Airplanes";
    // Initialise the command to call the Async Method...
    GetAirplanesCommand = new AsyncCommand(GetAirplanesAsync);
    SelectAirplaneCommand = new AsyncCommand<Airplane>(ActionSelection);
}

private async Task ActionSelection(Airplane selection)
{
    string id = selection.ID.ToString();
    AppShell.Airplane = selection;
    await Shell.Current.GoToAsync($"{nameof(AirplaneDetail)}?name={id}");
}
In the ViewModel constructor we instantiate the new Command and have it reference an Async method of ActionSelection which will received the CommandParameter of type Airplane, from this we can store the selection in the Static Property in the AppShell.xaml.cs file. Finally we can call the GotoAsync on the Shell Navigation and notice that we pass not just the View we wish to navigate to but also the ID, this is called Shell URL Navigation and those used to URL Parameters will recognise the format. Now we need to receive the data in the called View/View Model.
If your wondering why we don’t pass the whole Airplane Model this is because just like URL Parameters on the web it can only be a string so we would have to JSON Serialize and then De-Serialize the other end, hence we store in a static variable, I’m only passing the ID just to show how this works obviously in this case we don’t need to as we can just grab what is in the Static Variable.
Add a new View and ViewModel for the AirplaneDetails page and don’t forget to add the BindingContext for the ViewModel to the top of the XAML page so they are linked, then in the ViewModel we need to receive the passed ID. We do this by using System.Web (Told you it was from the web world…) and have the ViewModel Inherit IQueryAttributable we implement that interface and we can read the passed in data so our new ViewModel will have:
public class AircraftDetailViewModel : BaseViewModel, IQueryAttributable
{
    public Airplane Airplane { get; set; } = new Airplane();

    private void GetAirplaneDetail(int ID)
    {
        // Would use the ID in here to search a List etc but in this sample we don't need it...

        Airplane = AppShell.Airplane;
    }

    public void ApplyQueryAttributes(IDictionary<string, object> query)
    {
        GetAirplaneDetail(int.Parse(HttpUtility.UrlDecode((string)query["id"])));
    }
}
Before we move onto the View and displaying the data we need to step back and discuss the GoToAsync as you may have noticed the nameof(AirplaneDetail) this is of course the name of the View we wish to Navigate to and if you had just run this code you would have hit a Null Reference Exception and this confuses many new to Xamarin/Maui Shell navigation.
In Shell you must register the routes to your pages in the main AppShell.xaml so your Flyout/Tabs etc with the associated pages, but if like in this case we have a page that is only accessible from another page we need to register that page routing with the Shell Navigation stack elsewhere so it knows where that page lives and how to find it.
For this reason open the AppShell.xaml.cs page and enter the following, which is the Static variable to hold our Airplane data as well as the Registration of the Route with Shell Navigation. You can enter just the names here as strings but I prefer to use the nameof expression as that way I get Visual Studio to prompt me with Intellisense so I know the Name is correct and no spelling mistakes and odd build errors letting the tools help me.
You can read more about Shell Navigation and how it all works on the Xamarin Docs as the MAUI Docs are still being written (At the time of writing this blog!) and you can find them here
public partial class AppShell : Shell
{
    public static Airplane Airplane { get; set; }

    public AppShell()
    {
        InitializeComponent();

        // Navigation Pages
        Routing.RegisterRoute(nameof(AirplaneDetail), typeof(AirplaneDetail));
    }
}
Rather than showing the view here you can have a look at the GitHub Repository for this blog series Here but why not try and build it yourself as an exercise the best way to learn after all is to do.
How to Access the Device features
So far we have built a demo app and your probably wondering well nothing new here we could have built a website to do this what about accessing the Device and the many things Smart devices can do these days like GPS Position, Battery Level, Accelerometers, Flashlight even send an Email/SMS or open the device browser. Well all these things and more can be done without writing a single line of device specific code with what was in Xamarin called Xamarin Essentials is now baked directly into MAUI. This is a whole host of features that are not UI related but you may need and currently as of MAUI Preview 14 include:
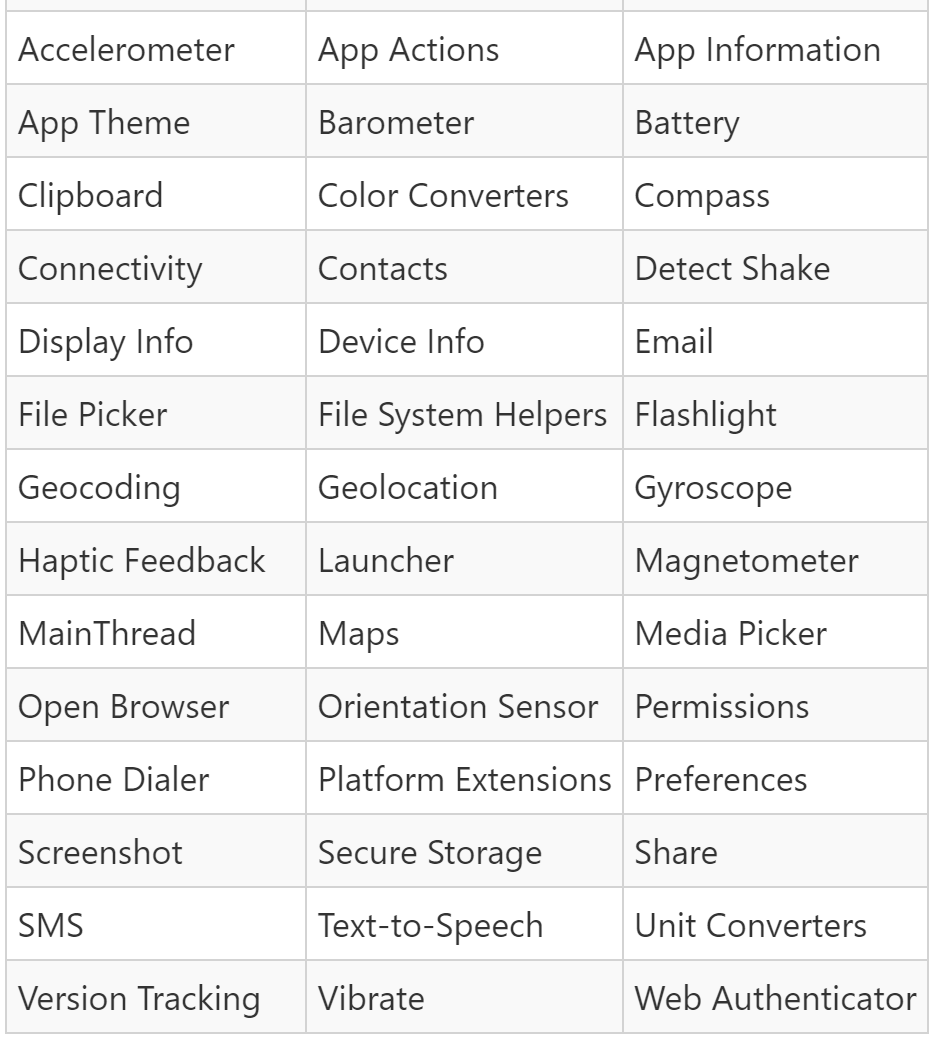
You can access all of these by adding the using Microsoft.Maui.Essentials namespace to your project and as it’s under the Microsoft.Maui namespace it’s built right into the .NET SDK rather than being a separate NuGet package.
In our current demo App we call out to the web to retrieve the Json file with our data, but what if the device has no connection to the web? this could cause an exception or worse our App to crash depending how we handle that exception so lets look at how we can check for this.
Connectivity
This is an important feature for mobile, but equally useful for desktop in order to handle both offline and online scenarios. In fact, if you have ever attempted to publish an app to the Apple App Store, you may have encountered this common rejection for not detecting connectivity status prior to attempting a network call.
Using the Maui.Essentials namespace checking is very easy and even though under the hood the way this is achieved is very different on each platform Android/iOS/MacOS/Windows etc that has been abstracted away and you have a simple if..Else statement.
var current = Connectivity.NetworkAccess;

if (current == NetworkAccess.Internet)
{
    // able to connect, do API call
}else{
    // unable to connect, alert user
}
Some of the services in the Essentials namespace require a bit of configuration per platform to set-up any entitlements/permissions the App will need, and this is what you see on your phone when you install a new app and you get a pop-up saying the App needs permission to access say the Camera or in this case the internet.
In this case iOS, macOS, and Windows don’t require anything, but Android needs a simple permission added to the “AndroidManifest.xml” which you can find in the Platforms/Android path of your .NET MAUI solution, and as this is for internet access it should already be part of the template so this line will be present for you but it’s always good to check.
<uses-permission android:name="android.permission.ACCESS_NETWORK_STATE" />
You can read the docs for additional information on this and the other Essentials libraries again at the time of writing you need to use the existing Xamarin Docs as the Maui docs are still in the process of being written but you can find them here
Adding this check to our App we would edit the GetAirplanesAsync() method in the AirplanesListViewModel.cs file to include the check like so:
private async Task GetAirplanesAsync()
{
    // Check if Busy and return early...
    if (IsBusy)
        return;

    try
    {
        // Set an IsBusy so that we can display an Activity Indicator while the data loads...
        IsBusy = true;

        var current = Connectivity.NetworkAccess;
        if (current == NetworkAccess.Internet)
        {
            // able to connect, do API call

            // Grab the data from the web with a bog standard HTTPClient call...
            var client = new HttpClient();
            var json = await client.GetStringAsync("https://www.cliffordagius.co.uk/data/Airplanes.json");
            var airplanes = JsonConvert.DeserializeObject<List<Airplane>>(json);

            //  Clear the Collection to make sure we are not adding to a full list...
            Airplanes.Clear();

            //  Add them all to the ObserableCollection.
            foreach (var airplane in airplanes)
            {
                Airplanes.Add(airplane);
            }
        }
        else
        {
            // unable to connect, alert user
            await Shell.Current.DisplayAlert("Network!", "You seem to not have internet access please check and try again...", "Ok");
        }
    }
    catch (Exception ex)
    {
        // A Bit of debug info and display an alert for the user...
        Debug.WriteLine($"Unable to get Airplanes data: {ex.Message}");
        await Application.Current.MainPage.DisplayAlert("Error!", ex.Message, "OK");
    }
    finally
    {
        // Set it to false to hide the Activity Indicator...
        IsBusy = false;
    }
}
Notice that we check as shown before with a simple if..else statement of the NetworkAccess.Internet enum and if this isn’t true then in the Else branch we use another part of the Shell stack to display an alert box to the user. This alert box will be a native alert box for the OS the App is running on and again the differences are abstracted away so you have a simple call you can await.
You can test this code easily either in your emulator or real device by putting it into flight mode after all this is an app about aircraft so it’s a good mode to use, this will then return from Connectivity.NetworkAccess an enum of NetworkAccess.None and you should see the Pop-up.
Mac Users wanting to play along.
I have been asked on Twitter about these blogs by someone who is a Mac user that couldn’t find the MAUI bits in Visual Studio for Mac so I wanted to let you know why.
Visual Studio 22 on Windows is where all the MAUI bits live for windows user but only in the Preview version until GA. However on MAC Visual Studio is currently undergoing a complete re-write from the old what was XamarinStudio so the team decided to wait until VS4Mac was released before trying to get MAUI working on Mac as well.
However if you wanted to play along with MAUI on your Mac there is a way, you need VSCode and the Omnisharp extension this will allow you to view and edit the files.
You will then need to install the MAUI workload to get the bits and this is a command run in the terminal:
sudo dotnet workload install maui
When you want to build and test you can use the following command from the Terminal:
dotnet build -t:Run -f net6.0-maccatalyst (or dotnet build -t:Run -f net6.0-ios -p:_DeviceName=:v2:udid={YOUR DEVICE UDID}
This will build and deploy your APP to your device and you can build and test your MAUI application.
For more information on the complete set-up @DavidOrtnau the Xamarin/MAUI PM wrote a great blog post on it HERE
Conclusion
This concludes our dive into Maui and I hope that those of you that have played with Xamarin and especially Xamarin.Forms will note that Maui is just the next step rather than something totally new. The tooling in Visual Studio 22 that enables Maui to be worked on is for me fantastic and a lot better than Xamarin with multiple projects in a solution you now just have the one project head with each platform tucked away inside the Platforms folder for that rare time you need it. If your a Mac user don’t fret Visual Studio for Mac will be getting the tooling as well but they didn’t want to add this to the already huge task of the VS4Mac rewrite so it’s planned for later in 2022.
As before the code is all up on GitHub for you to view/clone/copy as you see fit and I hope you have enjoyed this dive into Maui and feel free to reach out with questions if you have any, now go and hit File->New Project you Maui project and build that killer app that will make you millions.
Happy coding.