TOC
Part 2 - What’s next
Hopefully you see and enjoyed Part 1 where we talked about the hardware side of things and showed what can be used to connect to Azure IoT and how you as a .NET developer can use your existing C# skills to develop for IoT. In this post we are going to build on this and cover the software side of things by showing how to set-up an IoTHub in the cloud and the difference between a Device and an IoTEdge Device.
Let’s get started…
Azure IoT Hub?
In the last post we showed 3 devices the RaspberryPi the Wilderness Labs Meadow and finally the NanoFramework boards and you have probably looked at the Pro’s and Con’s and have a rough idea of what will suit your project, however I want to break this down a little more into the types of devices we can connect to our Azure IoT Hub and explain the differences as that could play a major part of your decision making on what to use and how.
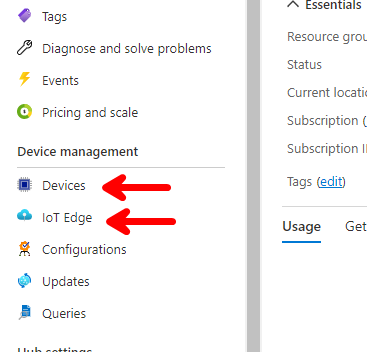
Looking at the Azure Portal for an IoT Hub we can see there are 2 choices a Device or an IoT Edge device so lets dig a little deeper into this decision.
Devices
Devices are what it sounds like a device like our 3 reference devices that connect directly to the Azure IoT Hub and send telemetry data direct from the device via some network like WIFI, Cellular, LoraWAN or as I have used on one client project, Satellite based Comms for working on ships at sea (very Expensive but worked great!).
Whatever your data connection is to reach the cloud the important part is that you need an Internet connection and the device needs to be able to run the Azure IoT SDK (or variant of!) so that it can talk directly to the Cloud in a way that Azure IoT can understand.
This limits the devices you can use use but there are still many off the shelf devices you can pick from, if you head out to the Azure Device Catalog you can see at the time of writing there are 2062 such devices and these are just the officially supported devices. Add in the use of NanoFramework and Wilderness Labs devices and we have more to pick from, albeit not officially supported by Microsoft and that is because they run a variant of the Azure IoT SDK developed for each platform.
IoT Edge
An IoT Edge device is somewhat different to a standard device in that they need to run a full OS like Windows or Linux and then on top of this OS they run what are called Modules. From our 3 devices we are tracking the RaspberryPi fits this as it runs Linux and is a fantastic Edge device and the reason I included it in our line-up, there is even an IoT Edge Install maintained by Microsoft you can install and run on your RaspberryPi assuming you can buy one in the current world of silicon shortages, if you want the actual files it is all open source and available on GitHub
Modules give the power to move some of the Cloud compute down to the device and hence the name Edge Device and as you can see in this image.
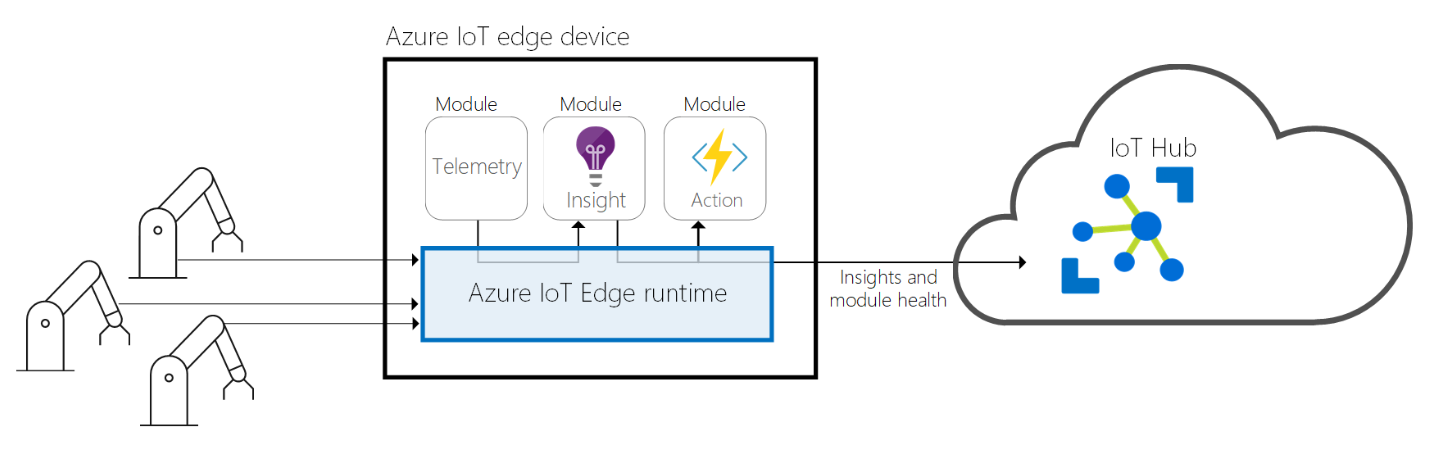
The main advantage of Edge devices is that by moving the Logic closer to the sensors and out to the Edge you don’t need to send all of your telemetry data back to the cloud for processing you can do the processing locally and reduce the latency as the round trip to the cloud is removed. You can then just send telemetry for the results or for storage and offline processing later or the insights from the local processing or even just health monitoring data of the Edge device and it’s leaf devices the decision is yours.
Since you now have this compute out at the edge with a powerful device you can then also run Cloud Logic like Azure Functions or Azure Stream Analytics and Azure Machine learning modules like say running a Vision Module to check an image.
Another advantage of having IoT Edge devices is that they can act as a Gateway for your smaller IoT Devices which are then known as leaf devices, so if you have very low powered devices and sensors that don’t themselves have Internet connectivity they can connect to one of these Gateways and have their data processed locally and/or sent to the cloud for processing, this means you can use for example Bluetooth LE to connect devices in a Mesh network and have just the one device with a Cloud connection.
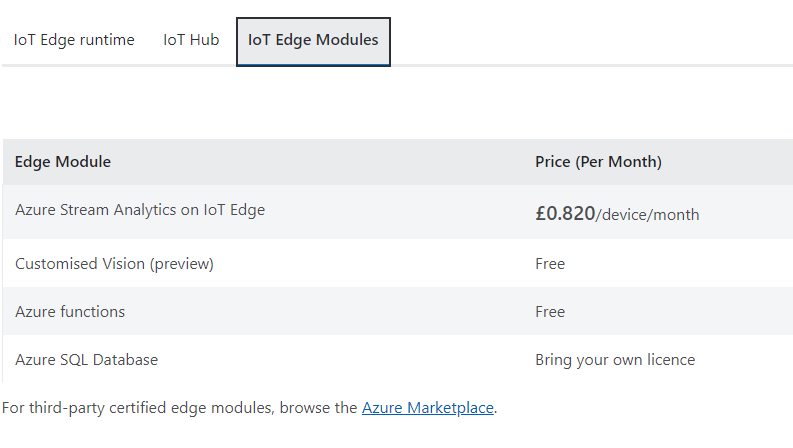
The best part about IoT Edge device and the part your Boss/Accounts team will love is that Azure IoT edge is free as it’s your device doing all the work so nothing to do in the cloud other than any costs associated with your IoTHub messaging if you use it.
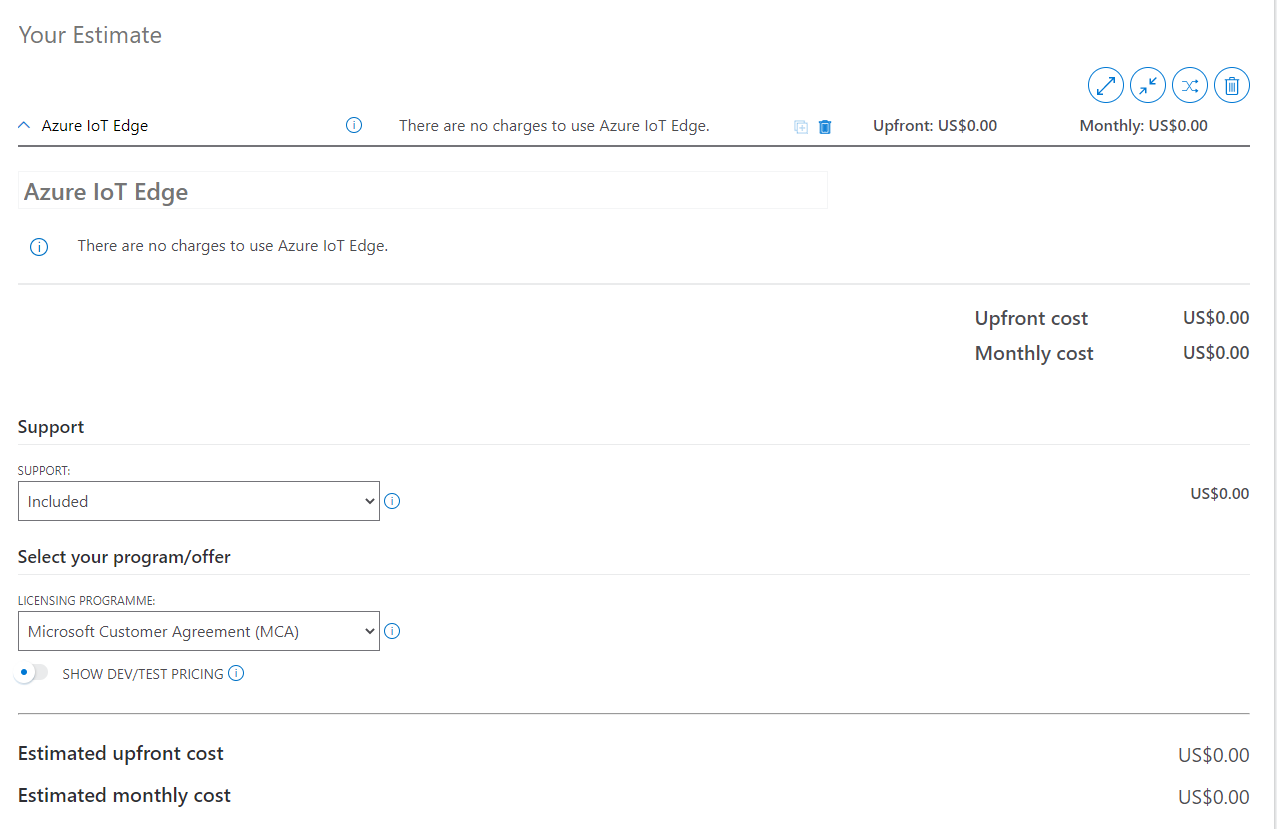
Even if you want to use Azure functions or the preview of the Custom Vision that also is free:
There is a lot more Edge devices can do that are beyond the scope of this blog but you can read more as always at Docs.Microsoft.com
Let’s Set-up the Cloud
Now we have covered the devices and what they are lets set-up an Azure IoTHub so head out to the Azure Portal and search for and create a new resource of an IoT Hub, giving it a Resource Group and Unique name etc.
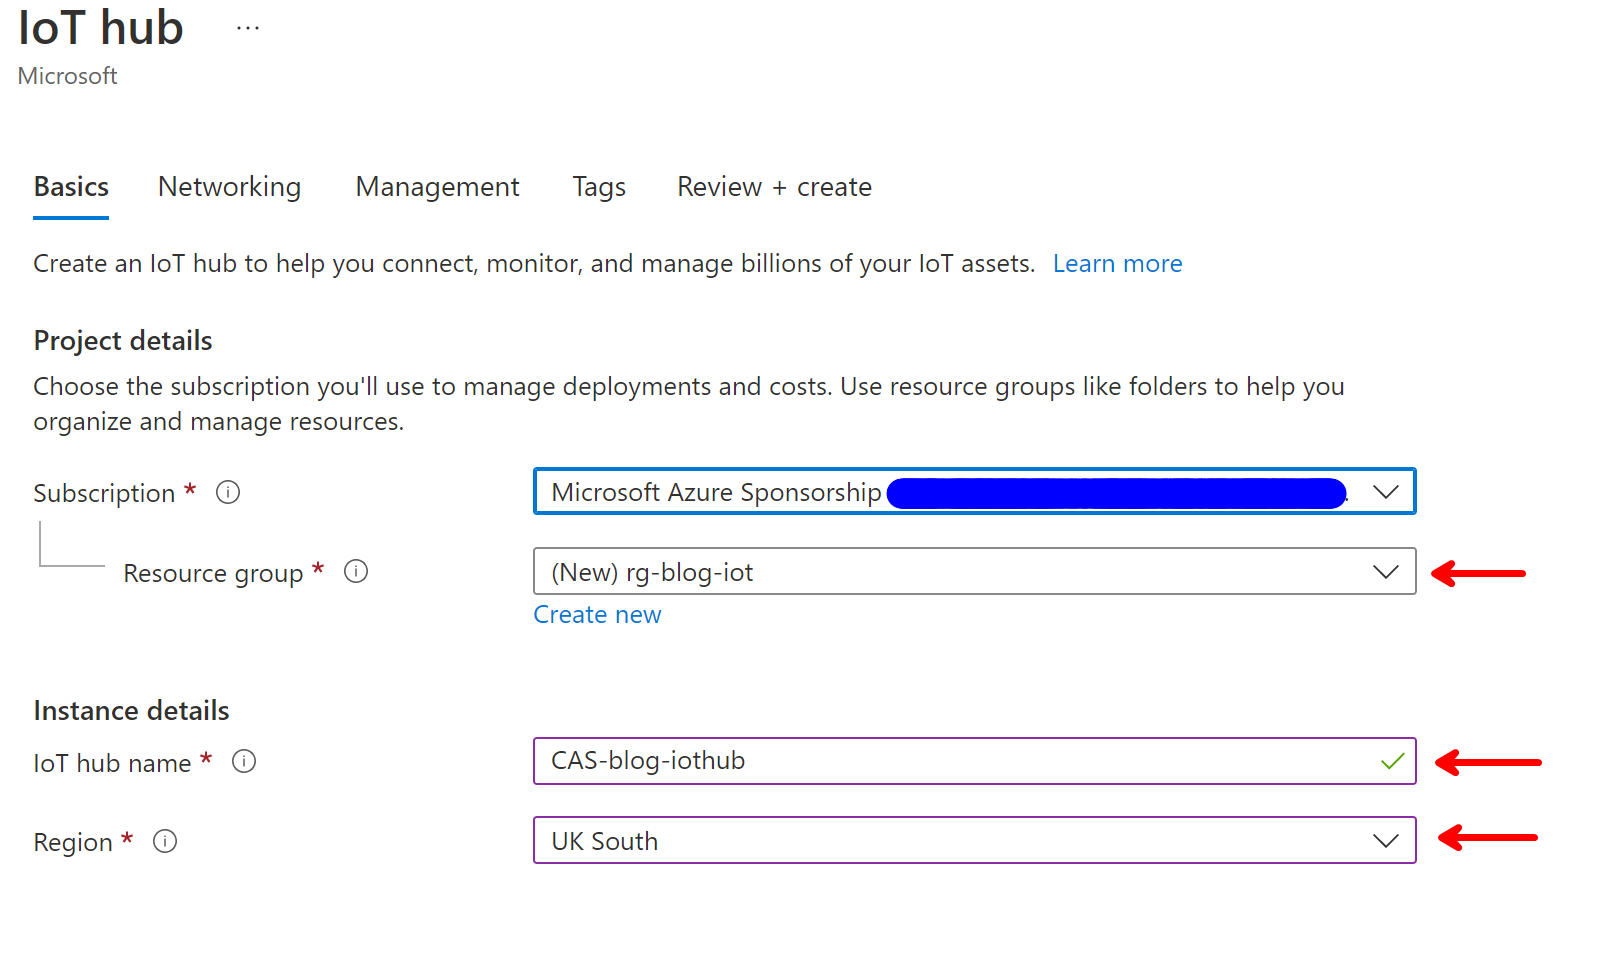
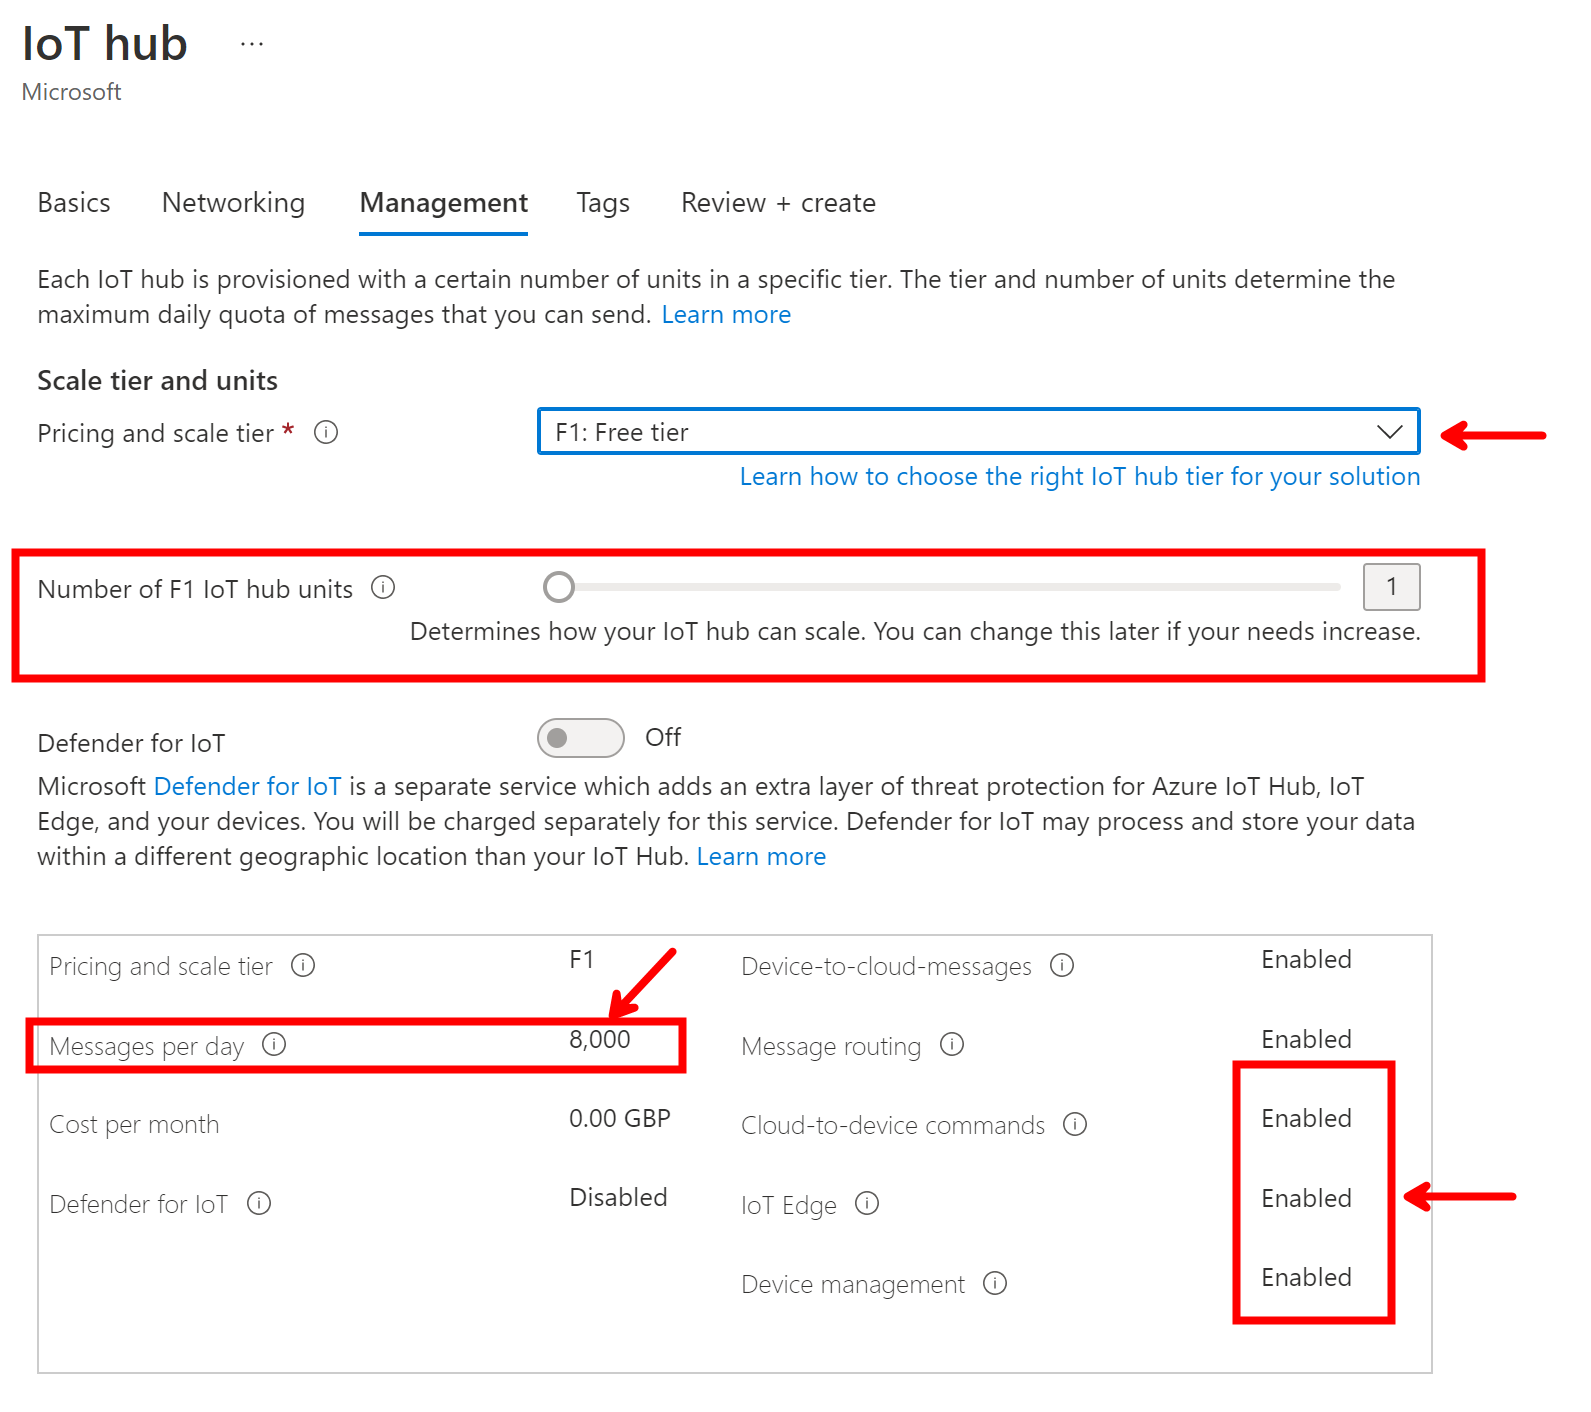
Networking we can leave as the default of Public Access I will leave you the homework of how to set-up a Private Access Network but moving to the Management tab we can select our pricing Tier.
We can set-up a Free Tier which only gives 8000 messages per day and is enough to play with and is fully functioning but you are only allowed one free IoTHub per Azure subscription. Basic Tier looks cheap but be warned that using this Tier means you will not be able to use the Cloud to Device messages and IoT Edge services as well as a few other restrictions, obviously you can select the Standard tier but the prices then start to rise.
The important calculation here is on the number of devices you have in your system and the number of telemetry messages they will be sending each day, it can sometimes be cheaper to have 2 or 3 S1 IoTHubs than 1 S3 for example so do the Maths your boss/accounts department will thank you later.
In our example below we will be sending a message every 5 seconds so the calculation will be:
24 * 60 * 60 = 86,400 seconds per day

Divide by 5 gives - 17,280 messages per day.

But with a limit on the Free Tier of 8000 per day you can see how quickly they are used up in a little over 11hrs.

If you picked an S1 Tier with a limit of 400,000 per day you would need to have 23 devices before they are all used up?
For now we can leave the other settings as defaults but you can check them out at Docs.Microsoft.com if you want to dig deeper.
When you click create the resource is validated and then you are presented with a review. If you leave all the settings at default other than changing the Tier to Free it will look something like this:
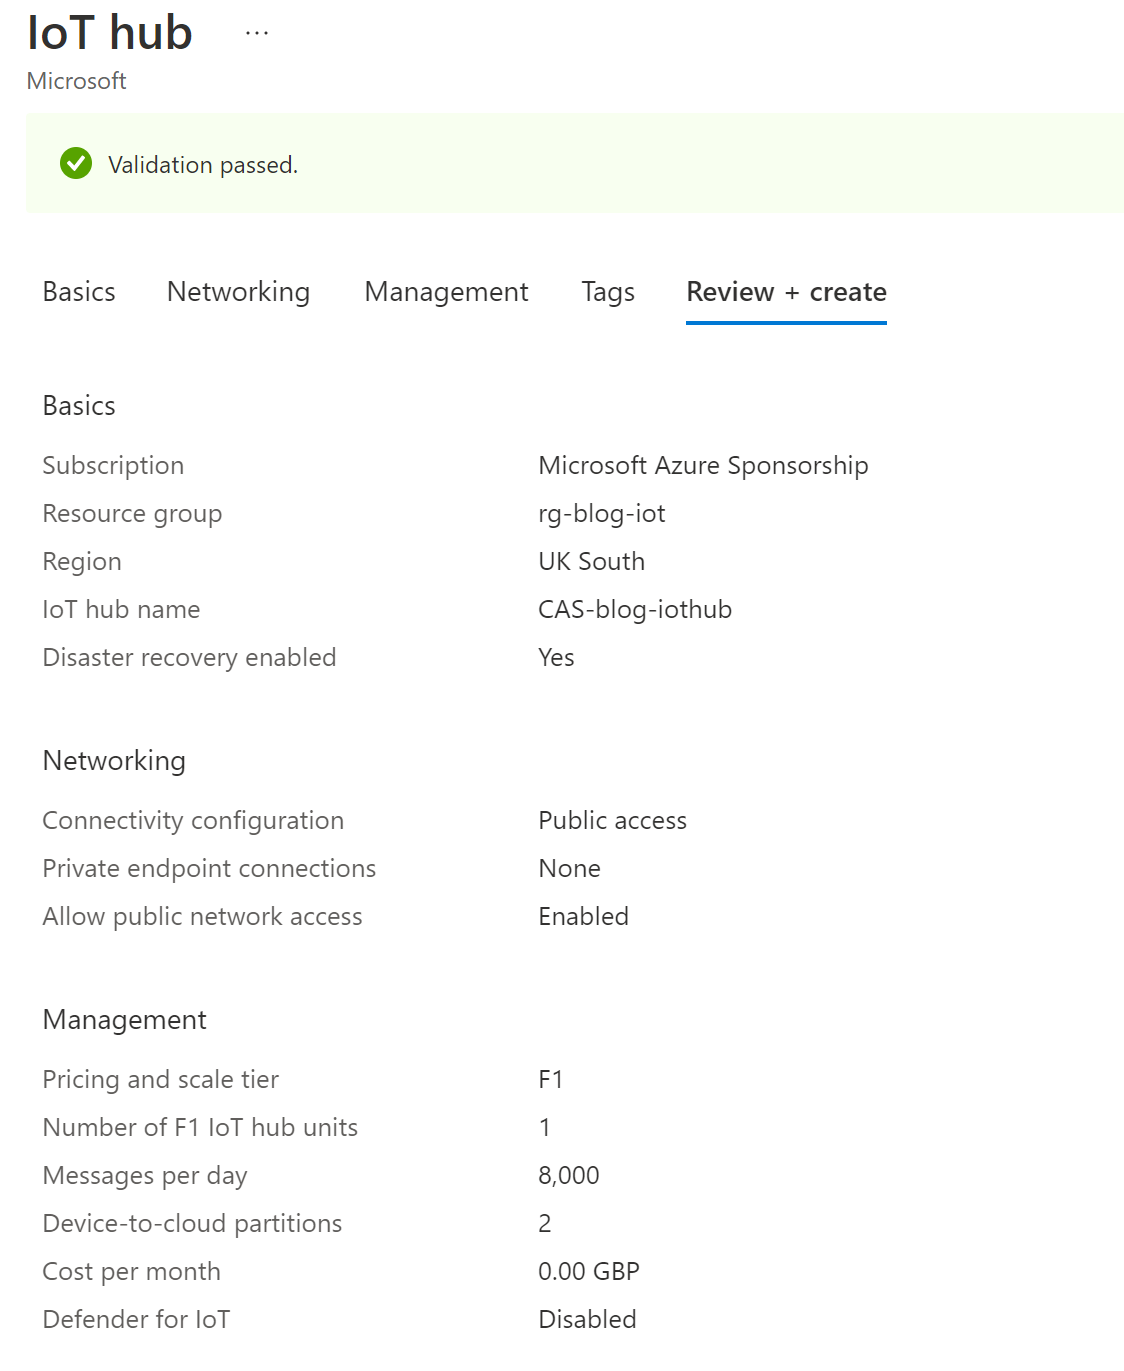
Click Create and after a few minutes you will have a nice new IoTHub ready to connect devices.
Connecting a Device
Now we have a Hub we can get one of our devices to connect and for no real reason other than I have a bunch here on my bench I am going to use an ESP32-Cam module and NanoFramework to connect.
Rather than make this blog post super long if you are playing along you can find more on the set-up of the Esp32 and your local dev environment for NanoFramework on a blog I wrote here.
From that post you will see the following code and that we start at a GPS location in this case the Royal Observatory in Greenwich London (Great place to visit!). Every 5 seconds it sends a Device-to-Cloud message (D2C) which is a new GPS location that is faked in the code to simulate an aircraft flying around (I told you I like planes right!).
But you can see there is also a method called OnMessage in the middle of the code file that shows how the device can receive a Cloud-to-Device (C2D) message from the IoTHub and act upon that message, in our case it resets the faked GPS location to the location passed from the Cloud.
    using Amqp;
    using nanoFramework.Networking;
    using System;
    using System.Diagnostics;
    using System.Text;
    using System.Threading;
    using AmqpTrace = Amqp.Trace;

    namespace ConnectESP32ToIOTHub
    {
        public class Program
        {
            // Set-up Wifi Credentials so we can connect to the web.
            private static string Ssid = "<<YOUR SSID>>";
            private static string WifiPassword = "<< WIFI PASSWORD >>";

            // Azure IoTHub settings
            const string _hubName = "CAS-blog-iothub";
            const string _deviceId = "NanoFramework-Device1";
            const string _sasToken = "SharedAccessSignature sr=CAS-blog-iotub.azure-devices.net%2Fdevices%2FNanoFramework-Device1&sig=0eGgNE7BqjzWKfeffojGJYaTEQgFV72bTytkUCkU8qQ%3D&se=1631051254";

            // Lat/Lon Points
            static double Latitude;
            static double Longitude;
            const double radius = 6378;   // Radius of earth in Kilometers at the equator, yes it's a big planet. Fun Fact it's 6356Km pole to pole so the planet is an oblate spheroid or a squashed ball.
            private static Random _random = new Random();
            static bool TraceOn = false;

            public static void Main()
            {
                // Set-up first Point and I have chossen to use the great Royal Observatory, Greenwich, UK where East meets West.
                Latitude = 51.476852;
                Longitude = 0.0;

                Debug.WriteLine("Waiting for network up and IP address...");
                bool success = false;
                CancellationTokenSource cs = new(60000);

                success = NetworkHelper.ConnectWifiDhcp(Ssid, WifiPassword, setDateTime: true, token: cs.Token);

                if (!success)
                {
                    Debug.WriteLine($"Can't get a proper IP address and DateTime, error: {NetworkHelper.ConnectionError.Error}.");
                    if (NetworkHelper.ConnectionError.Exception != null)
                    {
                        Debug.WriteLine($"Exception: {NetworkHelper.ConnectionError.Exception}");
                    }
                    return;
                }
                else
                {
                    Debug.WriteLine($"YAY! Connected to Wifi - {Ssid}");
                }

                // setup AMQP
                // set trace level
                AmqpTrace.TraceLevel = TraceLevel.Frame | TraceLevel.Information;
                // enable trace
                AmqpTrace.TraceListener = WriteTrace;
                Connection.DisableServerCertValidation = false;

                // launch worker thread
                new Thread(WorkerThread).Start();

                Thread.Sleep(Timeout.Infinite);
            }

            private static void WorkerThread()
            {
                try
                {
                    // parse Azure IoT Hub Map settings to AMQP protocol settings
                    string hostName = _hubName + ".azure-devices.net";
                    string userName = _deviceId + "@sas." + _hubName;
                    string senderAddress = "devices/" + _deviceId + "/messages/events";
                    string receiverAddress = "devices/" + _deviceId + "/messages/deviceBound";

                    Connection connection = new Connection(new Address(hostName, 5671, userName, _sasToken));
                    Session session = new Session(connection);
                    SenderLink sender = new SenderLink(session, "send-link", senderAddress);
                    ReceiverLink receiver = new ReceiverLink(session, "receive-link", receiverAddress);
                    receiver.Start(100, OnMessage);

                    while (true)
                    {

                        string messagePayload = $"{{\"Latitude\":{Latitude},\"Longitude\":{Longitude}}}";

                        // compose message
                        Message message = new Message(Encoding.UTF8.GetBytes(messagePayload));
                        message.ApplicationProperties = new Amqp.Framing.ApplicationProperties();

                        // send message with the new Lat/Lon
                        sender.Send(message, null, null);

                        // data sent
                        Debug.WriteLine($"*** DATA SENT - Lat - {Latitude}, Lon - {Longitude} ***");

                        // update the location data
                        GetNewDestination();

                        // wait before sending the next position update
                        Thread.Sleep(5000);
                    }
                }
                catch (Exception ex)
                {
                    Debug.WriteLine($"-- D2C Error - {ex.Message} --");
                }
            }

            private static void OnMessage(IReceiverLink receiver, Message message)
            {
                try
                {
                    // command received
                    Double.TryParse((string)message.ApplicationProperties["setlat"], out Latitude);
                    Double.TryParse((string)message.ApplicationProperties["setlon"], out Longitude);
                    Debug.WriteLine($"== Received new Location setting: Lat - {Latitude}, Lon - {Longitude} ==");
                }
                catch (Exception ex)
                {
                    Debug.WriteLine($"-- C2D Error - {ex.Message} --");
                }
            }

            static void WriteTrace(TraceLevel level, string format, params object[] args)
            {
                if (TraceOn)
                {
                    Debug.WriteLine(Fx.Format(format, args));
                }
            }

            // Starting at the last Lat/Lon move along the bearing and for the distance to reset the Lat/Lon at a new point...
            public static void GetNewDestination()
            {
                // Get a random Bearing and Distance...
                double distance = _random.Next(10);     // Random distance from 0 to 10km...
                double bearing = _random.Next(360);     // Random bearing from 0 to 360 degrees...

                double lat1 = Latitude * (Math.PI / 180);
                double lon1 = Longitude * (Math.PI / 180);
                double brng = bearing * (Math.PI / 180);
                double lat2 = Math.Asin(Math.Sin(lat1) * Math.Cos(distance / radius) + Math.Cos(lat1) * Math.Sin(distance / radius) * Math.Cos(brng));
                double lon2 = lon1 + Math.Atan2(Math.Sin(brng) * Math.Sin(distance / radius) * Math.Cos(lat1), Math.Cos(distance / radius) - Math.Sin(lat1) * Math.Sin(lat2));

                Latitude = lat2 * (180 / Math.PI);
                Longitude = lon2 * (180 / Math.PI);
            }
        }
    }
As you can see the code running on the device is plain old C# and .NET and this is as mentioned the NanoFramework version of the code but if you wanted to run this on the Wilderness Labs Meadow or the RaspberryPi the only changes needed are to the Using Statements the rest of the code will just work. This just shows the power of .NET running everywhere, how cool is that.
Where is the Data?
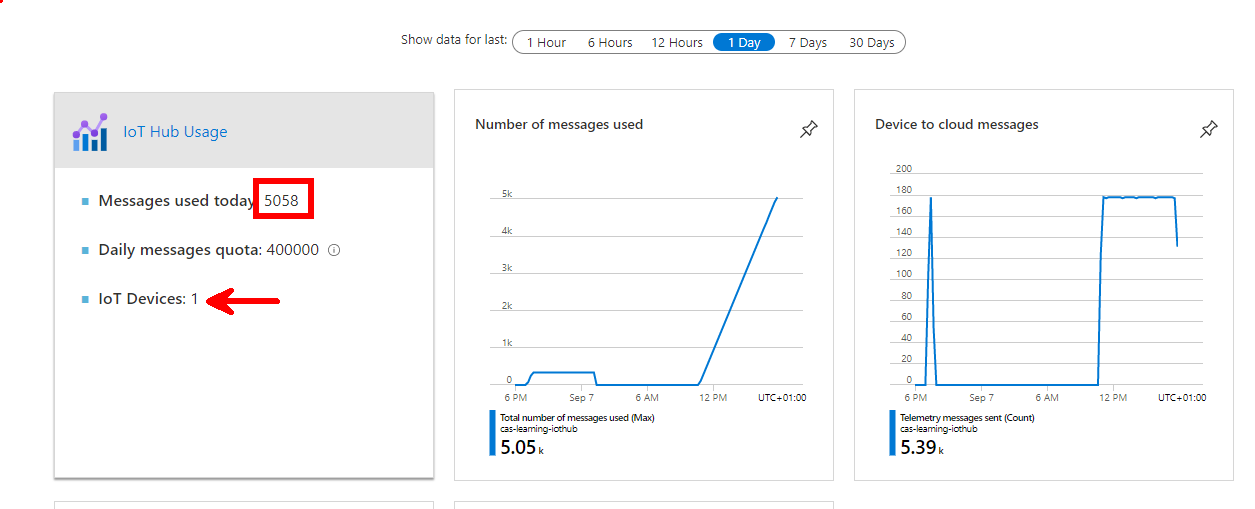
If we run the code above on either of the boards we will see that the data leaves the device and heads to the cloud so if we open the IoT Hub blade on the Azure Portal we can see that we have been using messages.
So the messages are arriving but how can we see what the data is? Well we can use a few methods like VSCode which is maybe the simplest and If you have not discovered already there is a fantastic Azure IOT extention for VSCode and it’s this that will be used here.
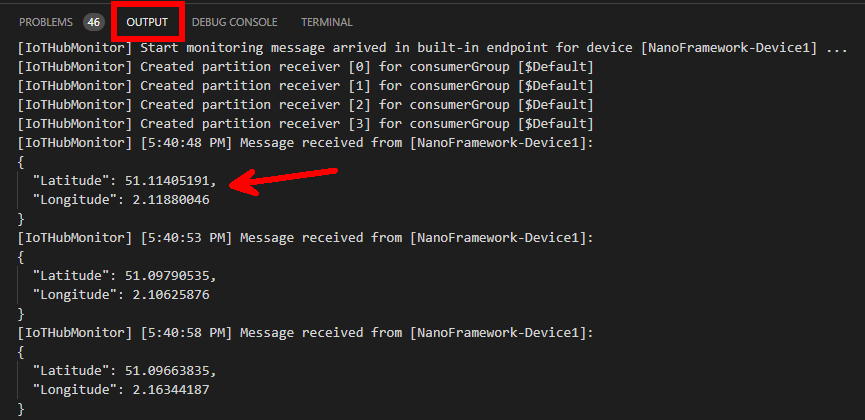
In VSCode once you have the extention installed and your IoTHub connection string filled in, if you right click on the Device in the list of your Azure IoT Hub and in the context menu select Start Monitoring Built-In Event Endpoint.
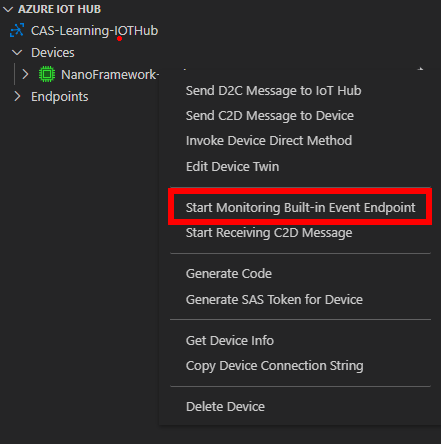
You will now see in the Output window all the messages arriving and you can check the data.
Sending a C2D Message
In the image above of the VSCode context menu you will see at the top Send C2D Message to Device and selecting this will allow you to format a message to send down to the device, the messages are sent in JSON format so easy for a .NET developer to understand and format using System.Text.Json
{
  "setlat": "51.470020",
  "setlon": "-0.454295"
}
You can see that this gives you the power to control the devices and change settings remotely, the message will be queued so that if it is say not always connected but sleeping between connections the message will be delivered the next time the device connects and this is taken care of for you by the IoTHub messaging system.
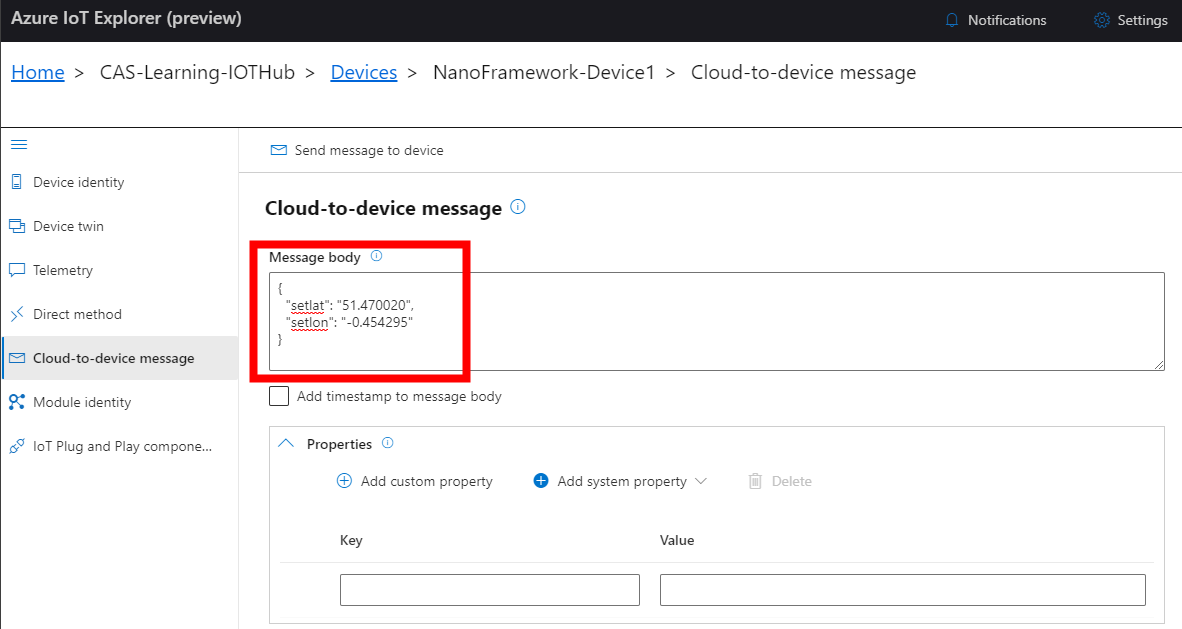
Another tool
If you don’t like VSCode or have a lot of devices and want a tool that is separate from a code environment there is a fantastic tool you can download called Azure IoT Explorer that gives all the same functionality but in a dedicated tool that I find easier to use once set-up, here you can see it being used to send the C2D message shown above.
Conclusion
In this second post of the series, we have looked at how to set-up an IoTHub and connect our devices using our .NET and C# skills as well as how to monitor the Telemetry data and send messages from the cloud to the device. In the next and final post, we will look at the cloud side in more detail and how we can streamline this process and what we can do with the data once it’s in the cloud.
If there is anything specific, you want to be covered or you wish to comment then please do reach out on twitter @CliffordAgius or contact the Ballard Chalmers team.
Happy coding.