TOC
Part 3 - The Cloud
Hopefully you see and enjoyed Part 2 where we looked at the software side of things, showed how set-up and connect to Azure IoTHub meaning you as a .NET developer can use your existing C# skills to develop for IoT. In this post we are going to build on this and show the cloud elements finishing off the picture of building an IoT system from End to End.
Let’s get started…
How can the cloud help?
Before we look too deep into the various cloud tools let’s think about the flow of our data from our devices, we set-up in previous posts and how we can take that data and make it accessible and usable by the business, as after all unless the business can use the data whats the point of collecting it!
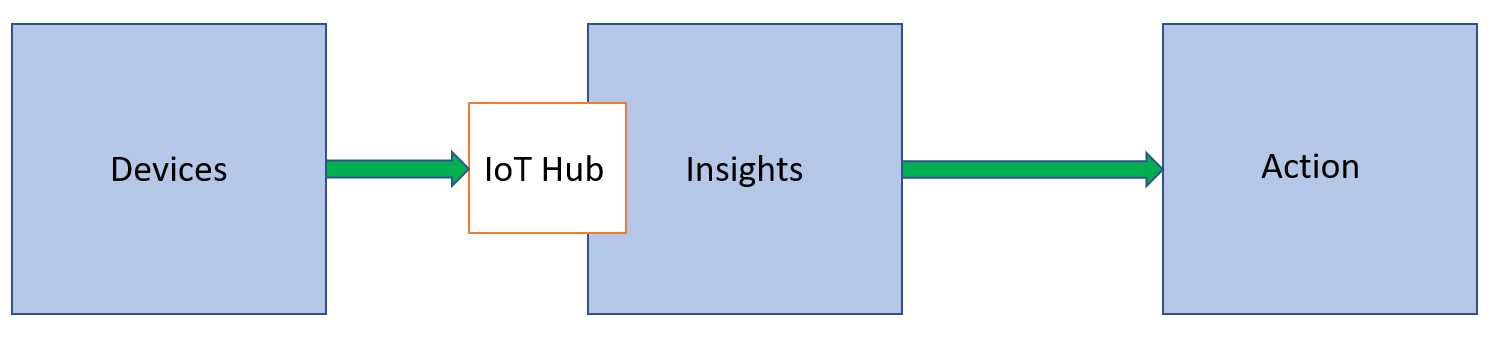
There are 3 steps in the flow we gather the data from the DEVICES in the field and the IoTHub will then ingest that data and either store or analyse it for INSIGHTS to then take ACTION on if required.
I know this sounds simplistic but it’s a way to divide the system in your mind (well it is for me anyway!) and the reference design shown later in the blog follows this principal as well, but I wanted to break it down with a block diagram first. The idea is that Devices are out in the big bad world collecting the data and streaming/sending this sensor data to your IoTHub which is your gateway into the cloud, from here you set-up your cloud infrastructure to process this data and take insights from it using various tools covered in a bit. Once you have some insights you can then take action on that data, it could be a PowerBI dashboard for staff to use or a logic app that will send an email or SMS to staff if an anomaly is detected.
Device Provisioning Service
Before we talk about the cloud section though we need to simplify the device connection workflow, you will see in the last blog post that there is a lot of set-up for each device and creating of keys and registering of the devices etc. This is all perfectly simple stuff and takes just a few minutes per device especially when you have done it a few times, but if you have or plan to have a large estate of devices it becomes a fulltime job to provision and manage those devices and of course this is time and money the project may not support.
This is where other Azure services can step in and help and the service, we want here is called DPS or Device Provisioning Service.
The best way to think of the Device Provisioning Service is as a Helper service that will allow you to provision devices with zero touch, meaning when the service is set-up you can just connect devices and it will auto provision them for you and connect them to the required IoT Hub based on the rules you set. As always, a picture speaks a thousand words…
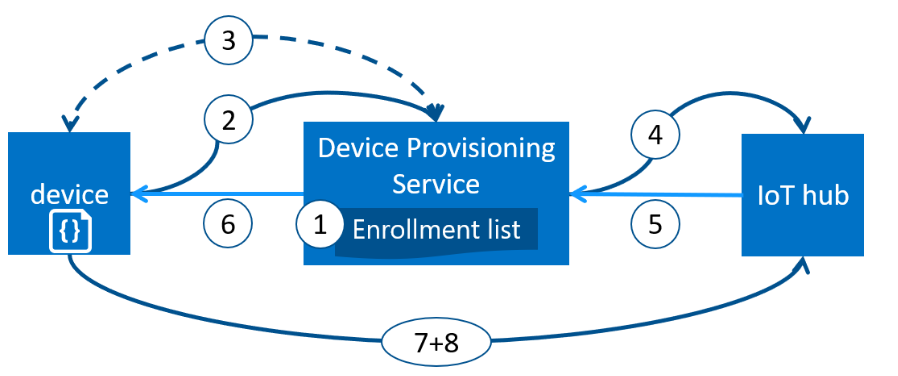
- Device manufacturer or you add the device registration information to the enrolment list in the Azure portal.
- Device contacts the DPS endpoint that has been set in code/firmware. The device passes the identifying information to DPS to prove its identity.
- DPS validates the identity of the device by validating the registration ID and key against the enrolment list entry using either a nonce challenge (Trusted Platform Module) or standard X.509 verification (X.509).
- DPS registers the device with an IoT hub and populates the device’s desired twin state.
- The IoT hub returns device ID information to DPS.
- DPS returns the IoT hub connection information to the device. The device can now start sending data directly to the IoT hub.
- The device connects to IoT hub.
- The device gets the desired state from its device twin in IoT hub.
This looks like a lot of work to set-up but the SDK helps here as well and it is just a few lines of C# code to make the connection to the DPS service and you will be given the IoTHub connection, you can review some code from an event run by Microsoft in 2021 which I showed off this service and the code is available on my GitHub Here
If you want to read some more about Azure Device Provisioning Service and how it can help you and your project head over to Docs.Microsoft.Com
Using the data in the Cloud.
The most important part of any IoT system is the data and in the last few posts we have shown you how to take an IoT device and write code using .NET to connect that device to the cloud and stream the data from various sensors, we have even shown you how to simplify the connection of the devices using DPS above. However as mentioned at the top the data is just arriving in the IoTHub and we can see it arrive but how do we use this data for analysis to gain insights and take actions? We can now look at a detailed reference design from Microsoft showing the possibilities.
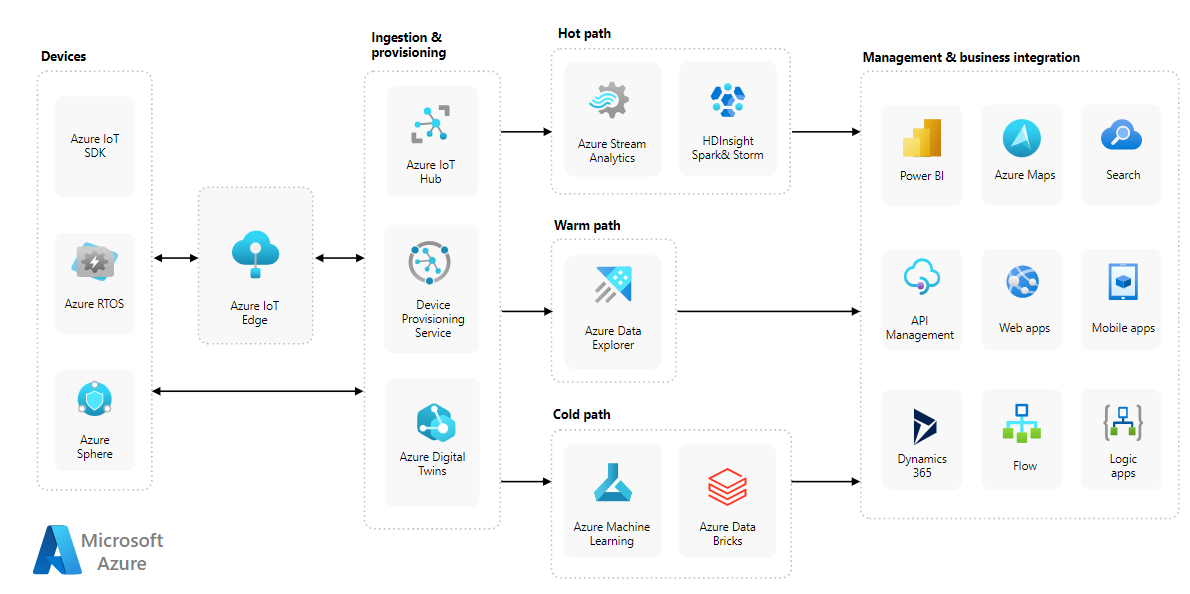
As you can see from this, we have various paths we can take depending on the data stream coming in from our devices and remember that an Azure IoT Hub scales to millions of simultaneously connected devices and millions of events per second so that is a lot of telemetry data to handle. Of course, you could lessen this by adding more Hubs which is a nice way to break a large infrastructure into manageable or geographic elements but be warned you have a hard limit of 50 IoT Hubs per subscription.
Azure Stream Analytics
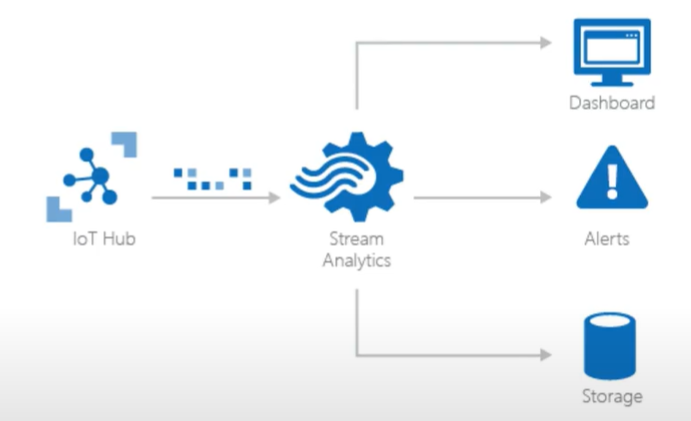
Now imagine we have a large estate of devices all streaming live data to our IoTHub meaning we could be streaming millions of telemetry events per second, and we want to analyse these events live pulling out moving averages or have alarms for values that go outside parameters! This is exactly the scenario that Azure Stream Analytics was designed for.
This hot path can deal with the millions of messages and Analyse them live on the stream with a view to raising an alarm if values go outside your chosen parameters or connect with a PowerBI dashboard so the back-office team can monitor the system.
Using a simplified SQL language which you can extend with code using C# and JavaScript or use one of the multiple built in Machine Learning Algorithms that allow you to detect anomalies. These include Spike and Dip to detect rapid rise/fall in a data point for example a rapid rise in vibration could indicate a bearing failure or Change point that can detect slow persistent changes in a value over time something us humans are not very good at for example a slow rise in oil temperature and pressure could indicate issue with a gearbox. Of course you can use the data stream to train your own models and there are tutorials in the docs to help with this Docs.Mircosoft.com
The best part about the Stream Analytics tool is that we can push it out to IoT Edge which means that our edge devices out in the field near the sensors can run these detection models and raise the alarm both locally and in the office meaning there will be a quicker response rather than waiting for the data to reach the cloud service, this could for example save a machine tool from destruction as it could be stopped before a bearing failed saving costs and downtime.
Azure Data Explorer
Azure Data Explorer is a fast, fully managed data analytics service for real-time analysis on large volumes of data streaming from your IoTHub. It’s a fully featured tool that allows you to Ingest the data from IoTHub in near real time and then query this data and visualize the results all in one tool. You can also have it take the data from your cold path of stored data in say a database if you are using it for analysis offline.
Azure Data Explorer or ADX as it’s known is a new service and it’s a replacement for Time Series Insights(TSI) which is scheduled for end of service in March 2025 there is a migration path if you are already using TSI but for new projects ADX is your go to. There is a free cluster you can register for that lasts amazingly 1 year and gives you a lot of storage and services so well worth a look Here
ADX uses yet another query language which is called Kusto which seems at first a bad decision by Microsoft but once you start using it you realise it’s an inspired decision as it’s like SQL but more like English and easier to understand for non-developers and that is the idea, meaning that back office staff can write a query to glean some insights into the data without too much special training.
StormEvents
| where StartTime between (datetime(2007-11-01) .. datetime(2007-12-01))
| where State == "FLORIDA"
| count
Kusto or KQL as it’s known is Case-Sensitive so be careful when typing out that query as I have wasted far too much time debugging when it was just a table column name I miss-typed. Once you have your queries set-up you can visualise them in ADX dashboards:
If the Kusto scares you then you can connect out to a PowerBI dashboard or even Excel to keep it in the Office family of products but one very nice way to visualize the data it to use Grafana which is Open Source and enables you to query, visualize, alert on, and explore your metrics, logs, and traces which is super powerful.
Business Integration
It’s been mentioned many times in this series about how the business can use the data and the insights it gives to manage the business and after all this is what the project is all about right, a way to give the business an edge over the competition in making faster and insightful decisions all based on real time data.
In the reference architecture diagram above you can see the many ways to utilise the data once it has been processed from PowerBi to a Power Automate Flow or a Logic App these are all Low or No code approaches to utilising the data streams.

Decision on PaaS v SaaS
One last point on Azure IoT and something that needs to be done before we try and connect our devices to the cloud and worry about how they will connect we first need to set-up the cloud environment and sadly even here we have a choice to make.
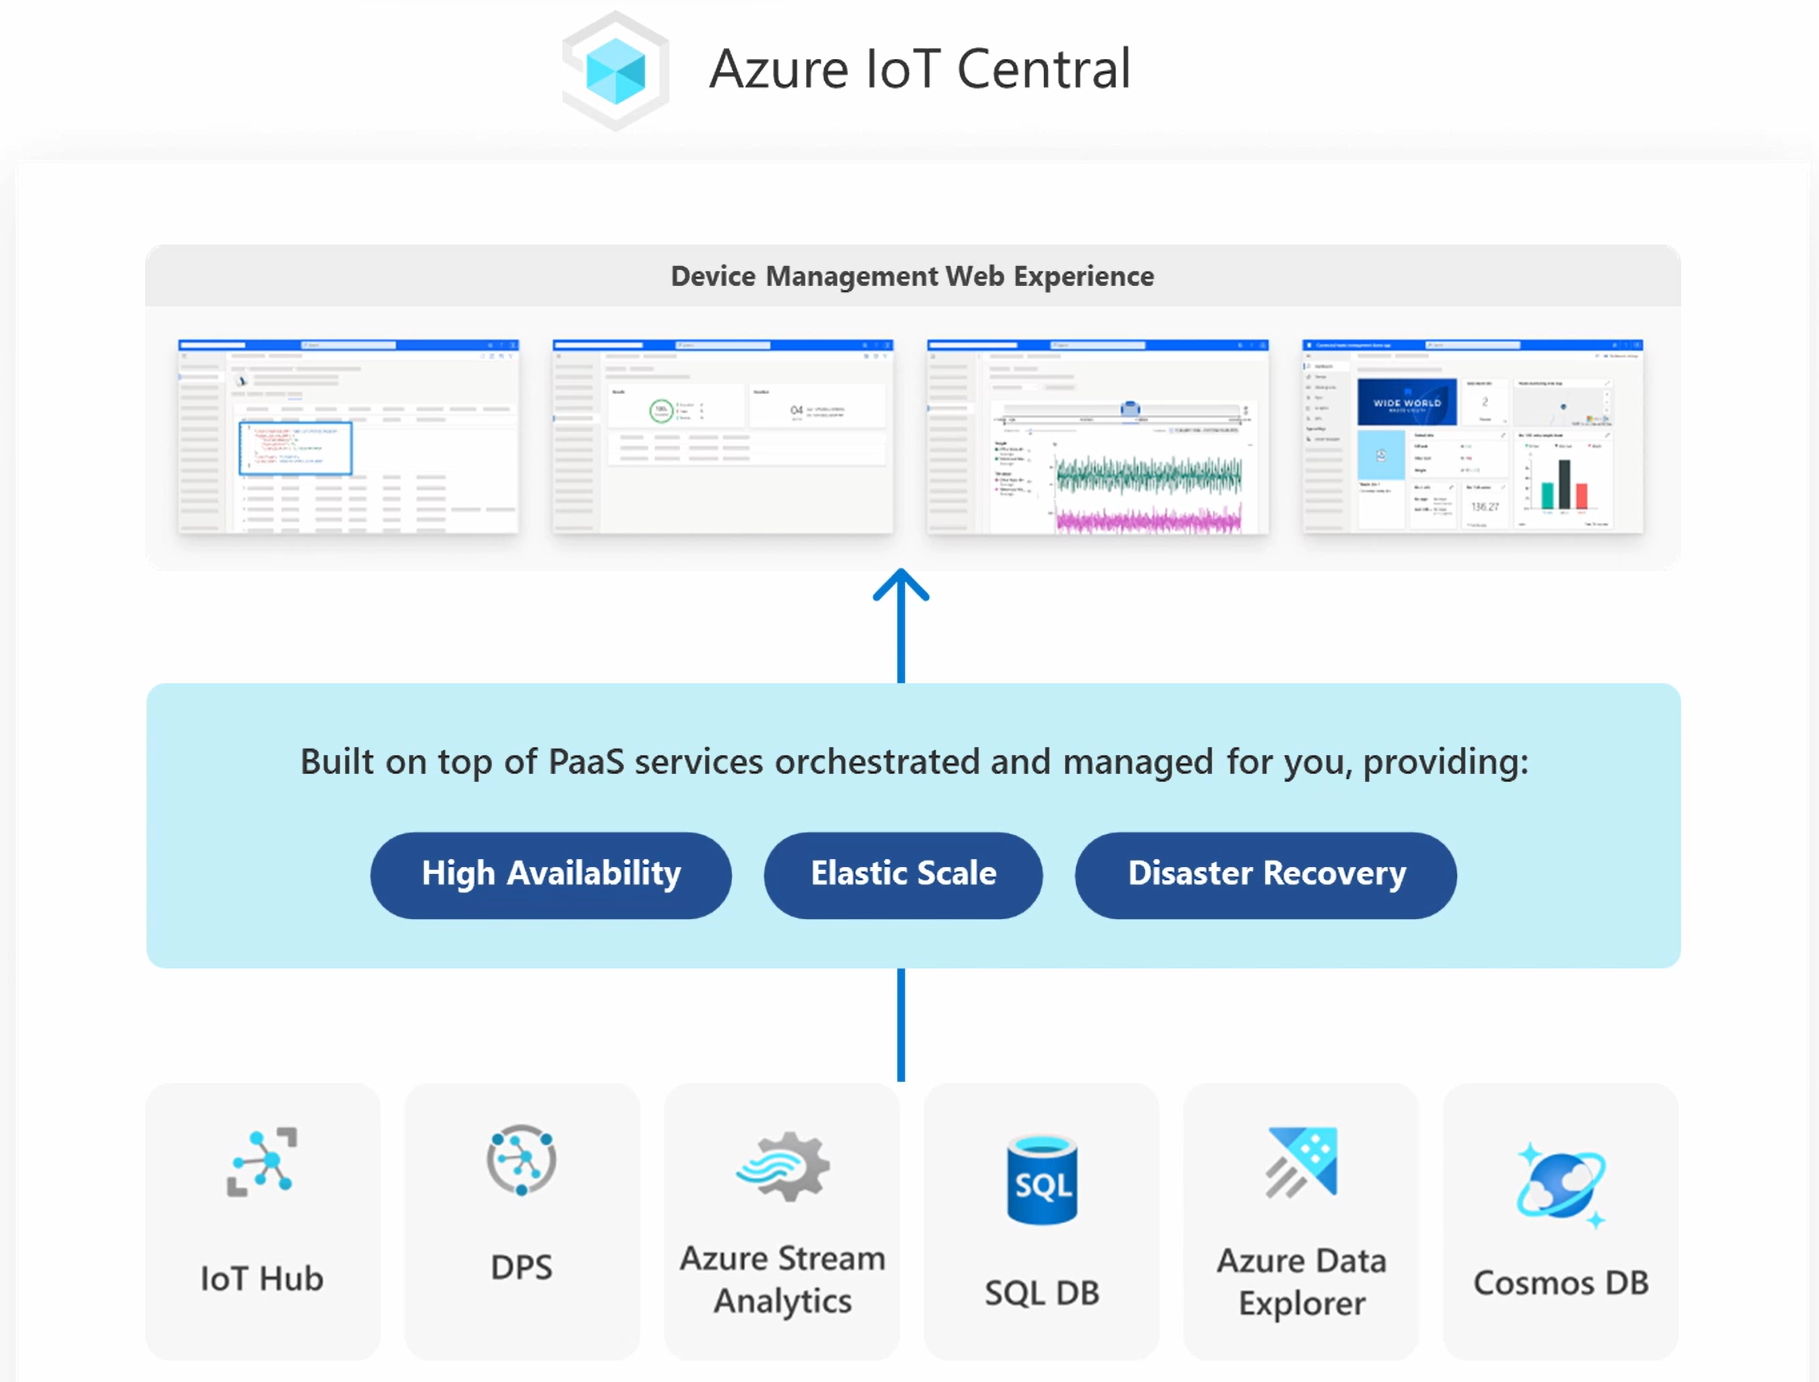
Microsoft have 2 main offerings the Azure IoTHub we have been covering so far, but there is another Azure IoT Central.
The main difference between them is that IoT Central is a SaaS offering that includes Azure IoTHub as part of the platform, it is where Microsoft suggest you start as it removes a lot of the complexity of building out the platform yourself, as otherwise you would need to provision and configure all the individual parts as we have covered which is time and money that could be spent elsewhere in the project.
You can see in this sales graphic that Azure IoT Central has all the core services we have discussed packaged nicely for us and all can be set-up in an easy to deploy system ready to use in a few simple clicks in under 10 minutes.
There is of course a difference in price for the two routes that is not just engineering time but for the actual services, IoT Central is priced on a per device structure so cheaper when you are just a few devices and setting up, whereas the IoT Hub is priced for the Hub and you can have virtually unlimited devices for that one price but you also have to pay for the other services like Device Provision Service, Azure Stream Analytics etc on top. The best way I have tackled this decision is to sit down and draw out what the IoT infrastructure will look like how many devices, what is the growth rate planned how many device messages will be required etc. For this initial design you can pick what will work best for your business adding in factors like engineering time and training etc.
Alternatively, you could start with IoT Central to get set-up and running to test the system design and check that the business wishes to make the decision to roll out the larger system before investing engineering time and money on the set-up of the PaaS system. This would need there to be a switch over and all the devices would need to be re-provisioned on the new system so take that into account in any planning as we all know the business will ask why the extra costs and downtime if it’s already working.
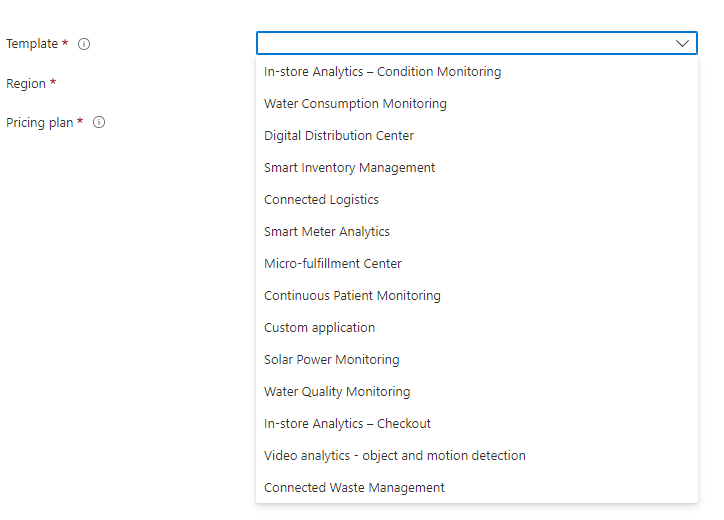
The other advantage of IoT Central, Sorry I know it sounds a bit salesy but want you to have the facts… When you create an IoT Central Application in the Azure Portal you get the option to even create one with a template of what the Microsoft IoT Team have seen as the most common scenario’s which may even save you more time and money, and if nothing else they are a great starting point for your own system. You can read more about the Templates here
Conclusion
In this the third and last post of the series, we have looked at the cloud side of the system from DPS to help provision all the devices to how to use tools like Azure Stream Analytics and Azure Data Explorer to gain Insights into our Device data and then a brief look at the Action step of business integration.
Lastly, we looked at IoT Central which if I am honest is a perfect starting place for nearly all project and where I often point people to start with any IoT roll-out as it’s a low investment in time and money to get a system up and running before you fully commit to the amazing world of IoT.
I really hope you have enjoyed this deep dive series into IoT and learnt a thing or two along the way and if there is anything you think I missed, wish to be covered in more detail or want to show off your IoT system please do reach out on twitter @CliffordAgius or contact the Ballard Chalmers team we are always more than happy to help.
Happy coding.